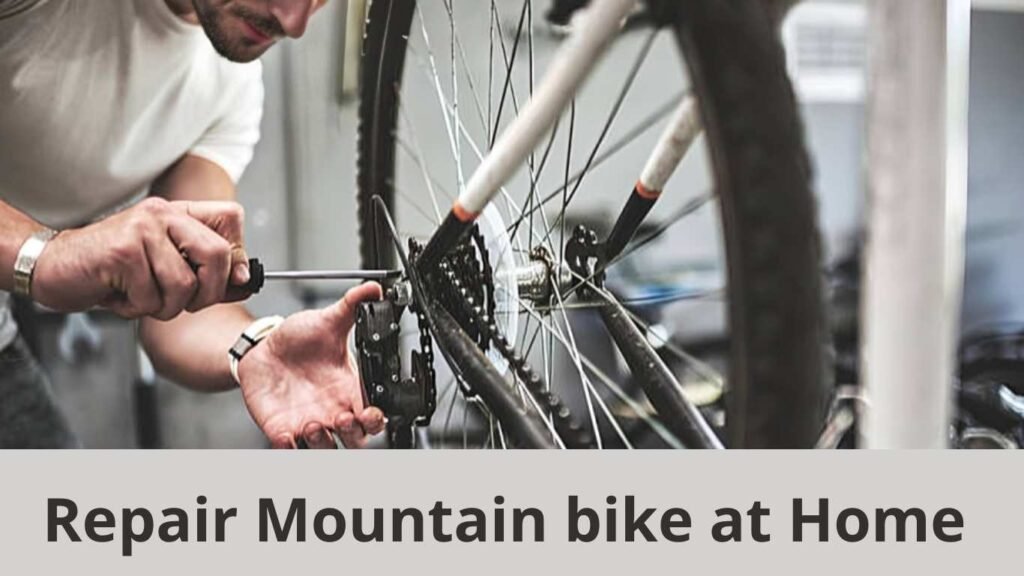
Mountain biking is a great way to explore beautiful places through dense forests and ride on trails like muddy trails, rocky descents, and rough climbs.
However, this adventure involves too many wear and tear on your bike.
That’s why regular mountain bike maintenance is important to ensure your safety, improve your bike performance, and avoid costly repairs in the future.
In this guide, we will discuss how you can do regular maintenance of your mountain bike at home.
Most importantly, you don’t need to be a pro mechanic or spend much time in the bike shop.
You just need a few tools and a little knowledge, which I will share, to handle most repairs right at your home.
We will discuss nine mountain biking maintenance tips you can work on.
Also read: Best Mountain biking trails in the USA
Why Mountain Bike Maintenance Matters

The first reason why mountain bike maintenance is important is because it increases your bike’s overall performance and gives you a better experience.
Let’s say you are on a downhill, and suddenly the brakes stop working, or the chain starts making noise, or you face a problem while shifting gears.
How would you feel? Frustrated, right?
So, to avoid this headache, regular mountain bike maintenance is important.
Here are a few benefits of doing regular maintenance.
Boosts Performance
The most common reason why mountain bike maintenance is important is performance.
For example! If you regularly lubricate your mountain bike chain so you can fix gear smoothly, you will have a more responsive brake, and you won’t hear annoying voices while pedaling, which will allow you to enjoy your ride more.
Prevents Breakdowns
Many times, a small problem will turn into a big one if you constantly avoid it, and therefore, you will have to pay money to fix that problem with a professional’s help.
That’s why you want to do regular maintenance like fixing loose bolts, worn-out cables, etc. Even a tiny crack in the frame can be a disaster on the trail.
Extends Lifespan
Your mountain bike is an investment that allows you to ride in a beautiful environment, like a forest area, to reduce stress and have a good time.
That’s why you also want to take care of your bike. If you do it, you can expand your bike’s life span.
Most importantly, you are not going to do anything fancy, just simple things like cleaning, greasing, and replacing worn parts as needed for your bike’s longevity.
Improves safety
As I mentioned before, mountain biking is an adventurous sport, and many times, MTB trails are unpredictable.
That’s why you want to have a reliable mountain to ride without any hesitation and avoid injuries. It’s also a reason why you will need to maintain your bike on a regular basis.
However, these are some of the most important reasons why you will need to maintain your mountain bike regularly. Now let’s know what you can do.
Also checkout: Safety Tips for Mountain Bikers
Clean Your Bike Thoroughly

When you ride a mountain bike through various trails, the mud, dirt, and grit get stuck to it, which later works like sandpaper.
And it’s not good for the bike’s moving parts like chains, gears, and bearings. That’s why you want to keep your mountain bike neat and clean.
Here’s how to clean your bike the right way:
1. Rinse Lightly
Firstly, you will want to clean it with water. So you can take a bucket filled with water and remove dirt and mud without forcing water into sensitive areas like bearings, hubs, bottom brackets, etc. High-pressure water can also cause rust, so you should avoid it.
2. Scrub Dirt and Grime
You can take a soft brush or sponge (like my old toothbrush) with a bike-specific soap to clean the bike. So you can take that too.
Besides this, you will especially pay attention to the drivetrain, cassette, chainrings, and derailleur gears because these MTB parts are exposed to more dirt than other parts like handlebars. So you must scrub them to remove built-up gunk.
One more thing: it’s better to avoid dish soap as it can strip away lubricants and damage finishes over time.
3. Degrease the Chain and Gears
The MTB chain is kind of a magnet that gets the most dirt. Especially because of grease, so you will need to pay special attention to it. So you want to have a degreaser to clean the bike chain.
After that, you’ll need a bike-specific degreaser, sit it for a minute, and scrub it with a stiff brush.
It will remove old oil or grime, which usually slows down the gear-shifting process.
However, after scrubbing and cleaning the chain, rinse it with water and wash away the leftover degreaser.
4. Dry Completely
Once you have cleaned the bike completely, now you will need to use a cotton cloth or a rag to wipe down the frame, chain, and other bike components.
Because if you mistakenly keep your bike wet, it can lead to rust, especially in hidden areas like bolts.
Besides this, you can also use compressed air or a hair dryer on low heat to blow out moisture.
5. Polish and Protect
Lastly, you can apply silicone spray or frame polish to make your bike look more shiny. It is optional but beneficial as this layer can protect from water, mud, or dust.
So you won’t have to clean with more effort next time.
Keep in mind that you want to clean your bike at least once a month, or sometimes, if you ride through a very dirty area (like mud), you should clean it just after reaching home.
Also read: Essential Mountain Biking Skills for Beginners and Intermediate Riders
Lubricate Key Moving Parts

Lubricating your mountain bike is very important to keep your bike running smoothly, reduce friction, and protect the bike from rust and wear.
But you want to lubricate the bike in a limited amount as excessive lubricant will attract dirt and grit, as discussed before.
What to Lubricate and How?
1. Chain
Mountain bike chains face the most abuse, and that’s why you want to lubricate them. First of all, you want to clean it, dry the chain, and apply a single drop of lube on each link as you slowly rotate the pedal backward.
After that, let it sit for a minute to penetrate the links, and then wipe off any excess lubricant.
Make sure to remove extra lube with cloth because if you don’t do it, your bike will get dirty too quickly.
2. Derailleurs
Derailleurs keep gear shifting smooth. But sometimes, their small pivots and wheels get sticky, so you also want to lube them.
So, you will rotate the pedal shift through the gears to distribute lubricant, but make sure you don’t overdo it.
3. Cables and Housings
Cables control braking and shifting. That’s why lubrication is important for them, too, as they also get dirt.
So, you want to lubricate the exposed cable section, especially near the entry and exit points of the cable or housing.
This simple way will keep your mountain bike smooth and more in control.
4. Pedals and Cleats
If bike pedals are squeaky, they can ruin your rhythm and experience, especially on longer rides or when you are working hard to climb a hill.
So you also want to apply lube on the pedal thread and cleat spring to reduce any noise and improve engagement, but don’t over-apply, as I have mentioned before.
Pro Tips for Choosing the Best Lube for Mountain Bike
There are different types of lube in the market, such as wet lube, dry lube, and ceramic lube, and they all have different works.
For example:
- A wet lube is good for those who often ride in muddy or wet conditions as it provides long-lasting protection from moisture.
- Dry lube is good for riders who often ride in dry and dusty areas where chances are high that dirt will build up. Plus, the dry lube is lighter and cleaner, but you will have to apply it more frequently, especially if you ride in wet conditions; it cannot last very long.
- The ceramic lube is a premium option that can last longer and reduce friction even more than standard lubes. It is good for advanced riders, but it is a bit expensive, so you can choose wet lube or dry lube depending on where you are going to ride the next time.
Also read: A complete MTB chain maintenance guide
Check Tire Pressure and Condition
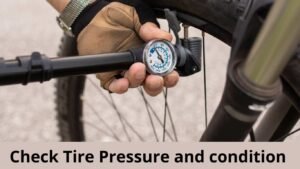
It’s hard to imagine riding a mountain bike without tires, as they connect the bike to the ground, right?
Therefore, keeping the tire in top condition is really important. When bike tires are properly maintained, they will improve traction, control, and overall performance.
Plus, with the right tire pressure, you can easily tackle rough terrains with confidence.
On the other hand, if you neglect tire pressure or tire condition, they will lead to flats or handling even dangerous blowouts during the ride.
Steps to Maintain your bike Tires
1. Inspect for Wear and Cracks
Firstly, you need to look at the tire’s side, like the tread and sidewalls, and pay attention to bald spots, deep cuts, or cracks.
If the tread is worn out, they can reduce grip, which is important on loose or wet trails.
Cracked sidewalls can lead to blowouts. Besides this, you also want to look for debris like grass thrones as they can cause punctures if you don’t fix them.
Also read: Essential Mountain Biking Safety Tips to Protect Yourself
2. Check Air Pressure
Tire pressure plays a very important role in providing comfort, control, and grip when the bike is at speed.
So, you want to use a tire pressure gauge to ensure that PSI matches your riding style and terrain.
Too low pressure can risk pinch flats with tubeless tires, and too high pressure might sacrifice traction and ride comfort.
3. Sealant Check (For Tubeless Tires)
Most tubeless tires rely on sealant to prevent any puncture. But sealant also dries over time. That’s why you need to keep checking it on a regular basis.
First, you have to remove the valve core and check the wheel. If it sounds dry, like no liquid moving, then you have to top it up.
You have to add the recommended amount of sealant and spin the wheel to ensure even distribution.
For longer rides, I suggest you carry a tubeless repair kit and spare sealant on longer rides, especially when you have caught tubeless tires.
Tire Pressure Guidelines
- If the PSI level is 20-25, it is considered low pressure, which is good for technical trails that have too many rocks, roads, and loose dirt.
- Medium tire pressure with 25-30 PSI is good for mixed terrain and general riding.
- High tire pressure, like 30-35 PSI, is good for smooth trails or hard-packed dirt where you need speed.
When the pressure is high, it reduces rolling resistance but sacrifices a little grip.
Also read: How to fix flat tires of your Mountain bike
Inspect and Replace Brake Pads
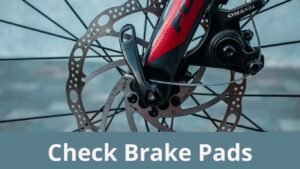
The brake is the most critical component for any vehicle, including mountain bikes. If you are on a downhill, you need to use brakes more frequently.
If they are not working properly, you can’t ride confidently; even if you do so, it’s not safe to ride like this.
Therefore, you want to regularly check your bike’s brakes. Ignoring them can cause accidents, especially in downhill riding.
Steps to Check Your Brakes
1. Look at Pad Thickness
Brake pads can wear out over a period of time, especially in muddy conditions where dirt accelerates wear.
That’s why you want to inspect the pads closely, and you can remove the wheel through the caliper slot, too. If you see that pad material is getting thinner, like 1 or 2 mm, then you should replace it to ensure your safety.
If you continue to ride with worn pads, it will reduce stopping power and damage your rotors. In future, you will have to pay more for this.
However, if you don’t know whether you need to replace your pads or not, you can compare them with their newer version, and you can see clear visual differences.
2. Test Stopping Power
Before riding your bike, you want to squeeze the brake levers to test if they are properly responding or not.
They should feel firm and should also engage smoothly without pulling too far towards the handlebar.
If the brakes feel spongy or weak, it means air has entered hydraulic brake lines. So, in such a case, you need to bleed the brakes to remove air bubbles and restore pressure.
If you have a mechanical disc brake, you want to check cable tension. It might be loose, so you will have to tighten the connection between the lever and the caliper.
Pro tip: You can test the brakes by rolling the bike forward and backward. Or you can take a small ride to check it.
Also read: 4 Week Training for beginner mountain biker
3. Clean Rotors and Pads
Brake performance is not just about pad thickness. Rotors and pads can also cause squeaking and poor power, so you want to use isopropyl alcohol and a clean cloth to wipe down both rotors and pads.
Bonus tip: If you go on a longer ride, you can carry spare pads; they are small and lightweight but very crucial.
Adjust and Tune Gears
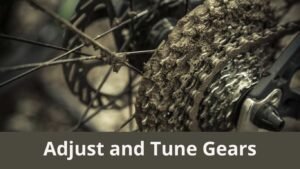
It’s really frustrating when gears skip or don’t shift smoothly, especially on climbing. However, this problem can be fixed by tuning your gears.
How to Tune Your Gears
1. Shift Through All Gears
First and foremost, you want to shift gears through each other, both front and rear, while spinning the pedals.
After this, you might notice clicking, grinding, or any hesitation as the chain moves between cogs.
If you feel a shift delay, it means the derailleur isn’t aligning properly, or you need to adjust the cable extension.
2. Turn the Barrel Adjuster
You should also try to adjust the barrel adjuster, which is located where the cable enters the shifter or barrier, which is a fine-tuned cable tension.
- You can see if the chain is struggling to move to an easier gear like the larger cogs, then in such a case, you can turn the barrel adjuster counterclockwise. It will improve tension.
- If the chain hesitates when shifting to a harder gear like the smaller cogs, then you need to turn it clockwise to reduce tension.
However, don’t over-adjust the barrel adjuster. If you keep turning without any improvement, the problem might be somewhere else, like the worn-out cables or bent derailleur hanger.
In such cases, you may need to change the cable or visit a mountain bike mechanic.
3. Set Limit Screws

The limit is to control how far the derailleur can go, which prevents the chain from overshooting and falling off either the smallest or the largest cog.
- High Limit Screw (H): You can adjust the smallest cog (hardest gear) by turning it clockwise to stop the derailleur from moving too far outward.
- Low Limit Screw (L): It controls the largest cog (easiest gear), so you can turn it clockwise to keep the derailleur from pushing the chain past the biggest cog.
When you adjust the screw, you can shift the lowest and the highest gear and watch the derailleur.
The jockey will need to be aligned perfectly with the cog; if it is not, then you can turn the screws until they are centered.
Bonus Tip: Replace Cables and Housing
If you try all these methods but none of them work properly, and you still feel sluggish after tuning, then the problem might be in your cables and housing.
In such a case, you want to use a mechanic to replace it because the cables stretch or fray over time as they collect more dirt, which causes drag and slow response. So you will need to replace it.
Signs You Need New Cables:
- Frayed ends or kinks
- Corrosion or rust.
- Sticky or rough-feeling shifts even after adjustments.
Pro Tip: When you replace your old cables with the new ones, you need to retune the gears. Fresh cables also tend to stretch slightly during the first few rides.
Also read: How to improve core strength for better balance during mtb riding
Check the Chain for Wear
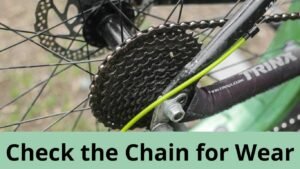
Over a period of time, the mtb chain gets stretched, and it starts to wear out faster than you might even think, especially when you ride more frequently on rough terrain.
In such cases, when the chain is stretched, it damages important mountain bike components like cassettes and chainrings. So you want to check your chain for wear.
The easiest method to check if the chain is wearing out is with the Chain Checker tool. It will help you measure how much the chain has stretched over time by comparing the distance between the links.
Here is how it works!
- If it is 0.5% stretched, it means it is still in good shape, but it has started to wear.
- If the chain is 0.75% stretched, it indicates you need to replace it. It won’t last long anymore.
Note: If you don’t fix this issue, then get ready to damage the cassette and chainrings.
Besides this, you can measure your chain after riding 500 miles. So it will be easier for you to know when to replace it.
Inspect Links
Even if you do not have a tool, sometimes the distance between links also gives you an indication.
Plus, you can look for any stiff, rusted, or damaged links. Because when the link is stiff, it will cause skipping or erratic shifting.
On the other hand, if there is rust, it means they are being damaged, and they must have been exposed to moisture. Now, you can use a rag to wipe off dirt and debris.
Replacing a Chain
After riding 700 to 1500 miles, you need to replace a chain. However, it is just a general guideline of replacing that.
But it also depends on your riding condition. If you are riding in tougher conditions, maybe you will need to change after just 500 miles.
Also, replacing the mountain by chain sooner is better to protect your cassette and chainrings. Because if they start getting damaged due to the chain, they will cost you more money.
Also read: How to find the trails for Mountain biking in your locality
Tight all Bolts and Fasteners
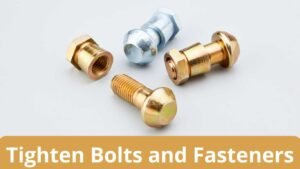
Checking bolts on a regular basis also needs to be part of regular mountain bike maintenance, as loose bolts are very common, and they cause annoying ratting, cracking, and, in some cases, part failures. So you have to tighten them regularly.
How to Check Bolts
1. Use a Torque Wrench
I know it’s a small part, but it’s really crucial for better performance.
You can use a torque wrench to tighten bolts, especially on critical components like stem handlebars and seat posts.
If you don’t do it, then under-tightening can lead to part loss during the mid-ride. Plus, you need to follow the manufacturer’s specifications for each component’s recommended torque setting.
For most parts, 5-8 Nm (Newton meters) is common, but you still need to verify before tightening bolts, so now you know bolts are important.
2. Focus on Crank Arms, Pedals, and Suspension Pivot Bolts
There are a few things that you need to pay attention to, like crank arms, pedals, suspension pivots, etc.
Their bolts tend to loosen up more quickly because of constant vibration while trail riding.
So before or after any ride, when you reach home, you want to tighten them. Sometimes, you can even notice any wobble in your crankset or pedal or feel any unusual movement in the suspension. It is also a sign that you need to tighten bolts.
Bonus Tip: Apply Thread Locker
If you notice bolts loosening more frequently due to constant vibration, especially in pedals or suspension pivots, then you can apply a little thread locker. This will ensure bolts stay secure and resist and do not loosen up quickly.
But make sure not to apply too much. It can also turn the bolt so tight that it will be hard to reassemble in the future.
Pro tip: You can use a blue thread locker for general use. It is good for easier removal in the future.
Because if you apply the stronger one, it will be very hard in the future if you want to reassemble some components of your mountain bike.
Inspect Suspension Components

A mountain bike’s fork and rear shock are very important components. They absorb impacts, help you ride smoothly, and give you better control.
That’s why you need to prioritize them in your regular mountain bike maintenance routine.
What to Check
1. Sag Settings
When you regularly maintain your mtb suspension, you can handle your bike very well. You can ride confidently and more comfortably while preventing costly repairs.
Seg setting means how much the suspension gets compressed when you sit on the bike. It’s very important to check for better suspension performance.
- If the suspension seg is too little, it will feel stiff and harsh.
- If it is too much, the bike will feel unresponsive or sluggish.
2. Clean Stanchions
As mentioned before, suspension works really hard to absorb impacts and provide you comfort. That’s why dirt and mud also get stuck to them.
The upper part of the fork and rear shock gets clogged, which can hamper performance and lead to damage.
Therefore, after a ride, you want to wipe the stanchions off with a clean cloth and remove dirt and debris. Besides this, you can also wipe seals carefully with a rag to keep them free from any dirt or debris.
Remember not to use harsh cleaners as they can also damage seals. So you can stick to water or a mild soap solution for cleaning.
3. Re-lube Seals
Suspension seals dry really quickly and crack, especially if you often ride in dusty or moist areas. Therefore, you want to keep your suspension properly lubricated to maintain its elasticity and prevent leaks.
When you clean the suspension, make sure to apply some suspension oil to the seal. Plus, you can gently compress the suspension to help the seals to stay hydrated and reduce any friction.
Bonus Tip: Get a Professional Service
Regular suspension cleaning and lubrication are important as the suspension gives you comfort. But I suggest you visit a professional after riding a bike for 50-100 hours, depending on the usage.
They can change oil, check dumpers, perform internal inspections, etc. Although this is optional, you would especially want to visit a professional if, after following all these steps, there is still a problem with suspension.
True Your Wheels

Wobbly wheels affect your bike’s handling capacity and make you feel very comfortable, but they are also unsafe.
Therefore, you want to ensure your wheels are true, meaning they are straight. It is good for a smooth and stable ride.
How to True a Wheel
1. Mount the Wheel in a Stand (or Flip Your Bike)
First of all, you need to mount the wheel in a wheel-truing stand so that you can easily see any wobble.
However, if you don’t have a tool or you don’t want to spend money on that, you can simply flip your bike upside down.
When you are turning the rear wheel, make sure to turn off the chain to prevent interference when you work.
2. Spin and Watch for Wobbles
Once you have flipped the bike upside down, then spin the wheel and watch closely for any wobble or bend. Try to notice if the wheel is straight or not.
You can spot where the rim moves side to side and listen to any scraping against the brake pads, as it can indicate where it is not aligning properly.
When you see any wobble, you want to focus on that section and continue spinning the wheel to see how much wobble affects overall alignment.
Besides this, you can also use a roller or a zip tie fixed to the frame to help you spot any small wobble more quickly.
3. Tighten or Loosen Spokes Slightly to Fix alignment
You can also adjust the spoke in the affected area. When you tighten the spokes on one side of the wheel, it will pull the rim towards the side.
On the other hand, loosening the opposite spoke will push the rim back into alignment.
These small adjustments can help you a lot in fixing wobbling wheels.
Warning: Major Damage May Need Professional Help
If you see your mountain bike’s wheel is too bent or you can’t fix it, then you will need professional help.
Sometimes, tightening spokes or making too many adjustments can damage your bike more than you will fix it.
Final Thoughts
Mountain bike maintenance is very important. It gives you better performance, such as riding faster and more safely without worrying about any breakdowns.
You can regularly or at least once a week clean your bike and do some small things like cleaning the chain, lubing it, checking brakes, tightening bolts, and adjusting suspension or handlebars.
A good thing is you don’t need too many tools or have to be a mechanic.
How often should I lubricate my mountain bike chain?
There is no specific time limit when you should lubricate your mountain bike chain. It totally depends on the riding condition.
For example, if you often ride in a wet condition, then you may need to lubricate after every few rides, and you will also have to wipe down all the dust and debris each time.
On the other hand, if you often ride on normal roads or in dry conditions, you may not need to lubricate too often. So, it’s important to listen to your bike chain, like a weird noise, problem while shifting gear, etc.
What are the essential tools I need for basic mountain bike maintenance at home?
You can simply have a small kit that includes a multi-tool like a chain cleaner and lubricant, a tire pressure gauge, a pump, and tire levers.
However, when you are more comfortable with the bike, after learning some repairing mtb skills, you can also add a few repairing tools like a torque wrench, cassette tool, bottom bracket, etc.
How do I fix a flat tire on my mountain bike?
If you get a flat tire, you need to remove the tire from the rim. You can use a tire lever to inspect the tire and the tube.
There might be a puncture, or you might need to replace the tube.
After that, you can set the tire back onto the rim, inflate the tire to the correct pressure, and reinstall the wheel.
Besides this, you can also carry a spare tube, tire lever, and a mini pump, especially for longer rides.
How can I tell if my mountain bike brakes need bleeding?
The first sign that indicates your mountain bike brakes need bleeding is that they start feeling spongy or kind of like a soft brake.
It reduces braking power as the lever pulls on the way to the handlebar.
Apart from this, you also can hear some weird and unusual noises from the brake, and if you experience anything like that, you need to fix the brake.
One more thing: If you can bleed your brakes by yourself, then do it; otherwise, you can also look for a professional who can do it for you, like a mountain bike mechanic.
Abraham is the creator of Mountain Bike Insider. He is a writer and researcher who enjoys mountain biking, working on DIY projects, organizing spaces, and testing ideas in real life. He focuses on clear and honest explanations based on experience and research, without pretending to be a professional expert.